 |
| An Interface of TWRP Recovery |
A tutorial and cautious about "Flashing custom ClockworkMOD (CWM) or TWRP recovery.img in
Rooted Android". Having custom recovery on your android can even help you
to repair your bricked android device! But it's hard to make an appropriate tutorial suitable for all Android devices in this regard.
Important Note: If you don't know what is root or what is recovery then do not follow this article. This is not for a beginner but for Advanced user. But don't worry installing recovery won't brick your Android. If you found any trick dedicated for your device then don't follow this tutorial.
This trick should work on all rooted Chinese MediaTek based devices and may not work on Samsung, HTC, Motorolla and other high class brand
Reasons Behind Flashing Custom Recovery in Android?
Most Android devices ships with a stock Android recovery. Here is some most important abilities of Custom recovery image:
- Installing Custom ROMs like CyanogenMOD or MIUI-MOD etc.
- Upgrading or downgrading Android version. Like 2.3.6 to 4.1.2 Or 4.2.1 to 4.0.4.
- Rooting and Unrooting ROMs
- Performing Hard Reset.
- Resetting Lost password or pattern lock.
- Erasing battery stats to get more backup or fixing wrong battery info problem.
Procedures for "Flashing Recovery Image In Rooted Android"
- Search and download the recovery.img file for your device via Google. e.g. CWM Recovery for Walton Primo E2.
- Put that recovery.img on the root of the SD card.
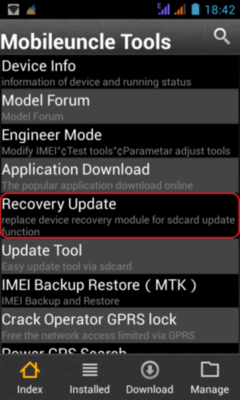
- Download, Install and Open Mobileuncle-Tools_20140111v2.9.9.apk.
- Now it will ask you for Superuser Access. Tap Allow to grant root permission.
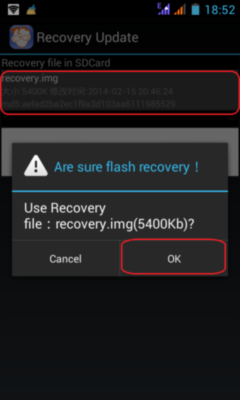
- Now tap Recovery Update. Mobileuncle Tools will automatically find the recovery.img from root of the SD card.
- Tap recovery.img like screenshot given below.
- Mobileuncle Tools will ask Are sure flash recovery !. So tap OK to start the flashing process.
- That's All. Your Android device will automatically reboot to recovery mod.
So enjoy experimenting Your smart Android OS. But it's recommended to
Backup your ROM via recovery before performing any experiment. So that
you will be able to recover your bricked phone if anything goes wrong.
If you want to turn on your phone in normal mod then tap or select Reboot System by using volume up and down key. You can use power button or Home button to select menus in CWM. And TWRP supports touch input.
If you need more information about "Flashing recovery.img on rooted
Android" then just leave a comment below. But please specify your device
model in your comment. So that I can understand your problem quickly.
So help yourselves!
Post a Comment